前回、Raspberry Pi 3に「Camera Module V2」を接続しました。今回はこれで実際に撮影してみたいと思います
【Raspberry Pi】Camera Module V2を接続する
Raspberry Pi3にCamera Module V2をつないでみました 箱に入っているのはこれだけ。説明書などはありません でも、心配はご無用。公式サイトに詳しい説明があります。英語だけど・・・ Raspberry Piに接続 僕は...
studio.beatnix.co.jp
2016.11.26
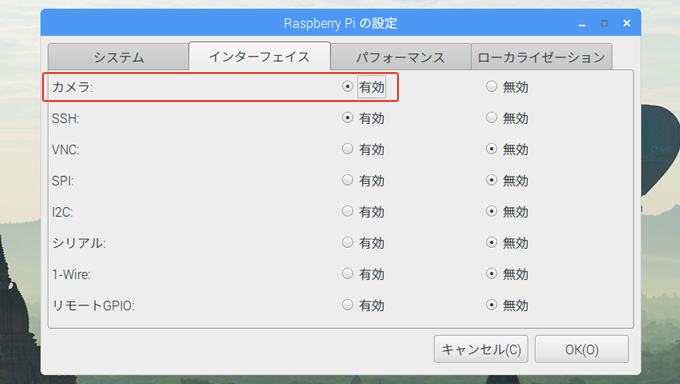
OSの設定
まず、ファームウェアをアップデートします
sudo rpi-update
カメラを有効にして、システムを再起動します
写真の撮影
撮影はコマンドラインとPythonから行えます。今回はコマンドラインで撮影してみたいと思います
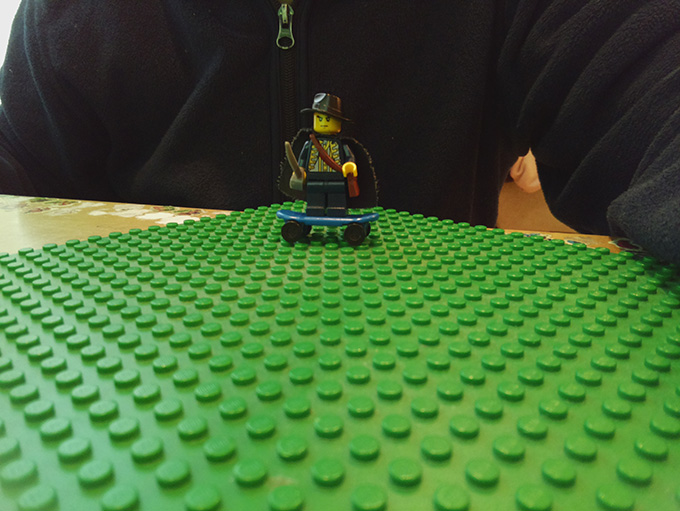
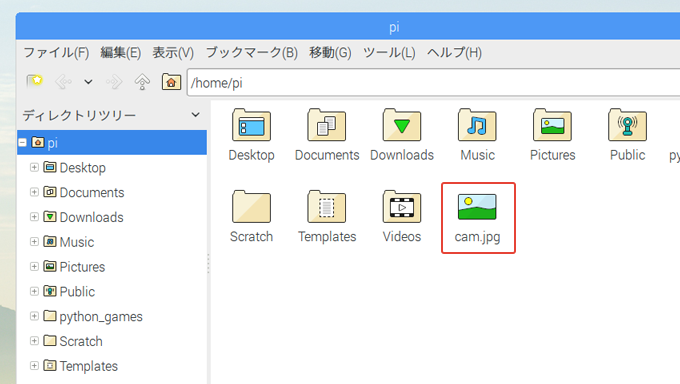
raspistillコマンドで撮影できます。-oで出力ファイル名を指定します
raspistill -o cam.jpg
写りはこんな感じ。結構綺麗に撮れます
-kをつけると自分のタイミングでシャッターが切れます(何枚か撮ると終了します)。xキーを押して、リターンで終了できます
raspistill -o cam.jpg -k
-pでプレビューのサイズを指定できます
raspistill -o cam.jpg -k -p 100,100,328,246
画像のサイズを指定しなければ3280×2464で撮影されます。出力先はホームディレクトリ。同じファイル名なら上書きされます
raspistillコマンドの使い方
Runs camera for specific time, and take JPG capture at end if requested

usage: raspistill [options]

Image parameter commands

-?, --help	: This help information
-w, --width	: Set image width <size>
-h, --height	: Set image height <size>
-q, --quality	: Set jpeg quality <0 to 100>
-r, --raw	: Add raw bayer data to jpeg metadata
-o, --output	: Output filename <filename> (to write to stdout, use '-o -'). If not specified, no file is saved
-l, --latest	: Link latest complete image to filename <filename>
-v, --verbose	: Output verbose information during run
-t, --timeout	: Time (in ms) before takes picture and shuts down (if not specified, set to 5s)
-th, --thumb	: Set thumbnail parameters (x:y:quality) or none
-d, --demo	: Run a demo mode (cycle through range of camera options, no capture)
-e, --encoding	: Encoding to use for output file (jpg, bmp, gif, png)
-x, --exif	: EXIF tag to apply to captures (format as 'key=value') or none
-tl, --timelapse	: Timelapse mode. Takes a picture every <t>ms. %d == frame number (Try: -o img_%04d.jpg)
-fp, --fullpreview	: Run the preview using the still capture resolution (may reduce preview fps)
-k, --keypress	: Wait between captures for a ENTER, X then ENTER to exit
-s, --signal	: Wait between captures for a SIGUSR1 from another process
-g, --gl	: Draw preview to texture instead of using video render component
-gc, --glcapture	: Capture the GL frame-buffer instead of the camera image
-set, --settings	: Retrieve camera settings and write to stdout
-cs, --camselect	: Select camera <number>. Default 0
-bm, --burst	: Enable 'burst capture mode'
-md, --mode	: Force sensor mode. 0=auto. See docs for other modes available
-dt, --datetime	: Replace output pattern (%d) with DateTime (MonthDayHourMinSec)
-ts, --timestamp	: Replace output pattern (%d) with unix timestamp (seconds since 1970)
-fs, --framestart	: Starting frame number in output pattern(%d)
-rs, --restart	: JPEG Restart interval (default of 0 for none)

Preview parameter commands

-p, --preview	: Preview window settings <'x,y,w,h'>
-f, --fullscreen	: Fullscreen preview mode
-op, --opacity	: Preview window opacity (0-255)
-n, --nopreview	: Do not display a preview window

Image parameter commands

-sh, --sharpness	: Set image sharpness (-100 to 100)
-co, --contrast	: Set image contrast (-100 to 100)
-br, --brightness	: Set image brightness (0 to 100)
-sa, --saturation	: Set image saturation (-100 to 100)
-ISO, --ISO	: Set capture ISO
-vs, --vstab	: Turn on video stabilisation
-ev, --ev	: Set EV compensation - steps of 1/6 stop
-ex, --exposure	: Set exposure mode (see Notes)
-awb, --awb	: Set AWB mode (see Notes)
-ifx, --imxfx	: Set image effect (see Notes)
-cfx, --colfx	: Set colour effect (U:V)
-mm, --metering	: Set metering mode (see Notes)
-rot, --rotation	: Set image rotation (0-359)
-hf, --hflip	: Set horizontal flip
-vf, --vflip	: Set vertical flip
-roi, --roi	: Set region of interest (x,y,w,d as normalised coordinates [0.0-1.0])
-ss, --shutter	: Set shutter speed in microseconds
-awbg, --awbgains	: Set AWB gains - AWB mode must be off
-drc, --drc	: Set DRC Level (see Notes)
-st, --stats	: Force recomputation of statistics on stills capture pass
-a, --annotate	: Enable/Set annotate flags or text
-3d, --stereo	: Select stereoscopic mode
-dec, --decimate	: Half width/height of stereo image
-3dswap, --3dswap	: Swap camera order for stereoscopic
-ae, --annotateex	: Set extra annotation parameters (text size, text colour(hex YUV), bg colour(hex YUV))


Notes

Exposure mode options :
off,auto,night,nightpreview,backlight,spotlight,sports,snow,beach,verylong,fixedfps,antishake,fireworks

AWB mode options :
off,auto,sun,cloud,shade,tungsten,fluorescent,incandescent,flash,horizon

Image Effect mode options :
none,negative,solarise,sketch,denoise,emboss,oilpaint,hatch,gpen,pastel,watercolour,film,blur,saturation,colourswap,washedout,posterise,colourpoint,colourbalance,cartoon

Metering Mode options :
average,spot,backlit,matrix

Dynamic Range Compression (DRC) options :
off,low,med,high

Preview parameter commands

-gs, --glscene	: GL scene square,teapot,mirror,yuv,sobel
-gw, --glwin	: GL window settings <'x,y,w,h'>
ビデオの撮影
-oで出力ファイル名を指定、-tで録画時間(ミリ秒)を指定できます
raspivid -o video.h264 -t 10000
録画したH.264形式のビデオはVLCメディアプレイヤーで再生できました(Raspberry PiのVLCでは再生できず、MacのVLCで再生できました)
Display camera output to display, and optionally saves an H264 capture at requested bitrate


usage: raspivid [options]

Image parameter commands

-?, --help	: This help information
-w, --width	: Set image width <size>. Default 1920
-h, --height	: Set image height <size>. Default 1080
-b, --bitrate	: Set bitrate. Use bits per second (e.g. 10MBits/s would be -b 10000000)
-o, --output	: Output filename <filename> (to write to stdout, use '-o -')
-v, --verbose	: Output verbose information during run
-t, --timeout	: Time (in ms) to capture for. If not specified, set to 5s. Zero to disable
-d, --demo	: Run a demo mode (cycle through range of camera options, no capture)
-fps, --framerate	: Specify the frames per second to record
-e, --penc	: Display preview image *after* encoding (shows compression artifacts)
-g, --intra	: Specify the intra refresh period (key frame rate/GoP size). Zero to produce an initial I-frame and then just P-frames.
-pf, --profile	: Specify H264 profile to use for encoding
-td, --timed	: Cycle between capture and pause. -cycle on,off where on is record time and off is pause time in ms
-s, --signal	: Cycle between capture and pause on Signal
-k, --keypress	: Cycle between capture and pause on ENTER
-i, --initial	: Initial state. Use 'record' or 'pause'. Default 'record'
-qp, --qp	: Quantisation parameter. Use approximately 10-40. Default 0 (off)
-ih, --inline	: Insert inline headers (SPS, PPS) to stream
-sg, --segment	: Segment output file in to multiple files at specified interval <ms>
-wr, --wrap	: In segment mode, wrap any numbered filename back to 1 when reach number
-sn, --start	: In segment mode, start with specified segment number
-sp, --split	: In wait mode, create new output file for each start event
-c, --circular	: Run encoded data through circular buffer until triggered then save
-x, --vectors	: Output filename <filename> for inline motion vectors
-cs, --camselect	: Select camera <number>. Default 0
-set, --settings	: Retrieve camera settings and write to stdout
-md, --mode	: Force sensor mode. 0=auto. See docs for other modes available
-if, --irefresh	: Set intra refresh type
-fl, --flush	: Flush buffers in order to decrease latency
-pts, --save-pts	: Save Timestamps to file for mkvmerge
-cd, --codec	: Specify the codec to use - H264 (default) or MJPEG
-lev, --level	: Specify H264 level to use for encoding
-r, --raw	: Output filename <filename> for raw video
-rf, --raw-format	: Specify output format for raw video. Default is yuv


H264 Profile options :
baseline,main,high

H264 Level options :
4,4.1,4.2

H264 Intra refresh options :
cyclic,adaptive,both,cyclicrows

Raw output format options :
yuv,rgb,gray

Preview parameter commands

-p, --preview	: Preview window settings <'x,y,w,h'>
-f, --fullscreen	: Fullscreen preview mode
-op, --opacity	: Preview window opacity (0-255)
-n, --nopreview	: Do not display a preview window

Image parameter commands

-sh, --sharpness	: Set image sharpness (-100 to 100)
-co, --contrast	: Set image contrast (-100 to 100)
-br, --brightness	: Set image brightness (0 to 100)
-sa, --saturation	: Set image saturation (-100 to 100)
-ISO, --ISO	: Set capture ISO
-vs, --vstab	: Turn on video stabilisation
-ev, --ev	: Set EV compensation - steps of 1/6 stop
-ex, --exposure	: Set exposure mode (see Notes)
-awb, --awb	: Set AWB mode (see Notes)
-ifx, --imxfx	: Set image effect (see Notes)
-cfx, --colfx	: Set colour effect (U:V)
-mm, --metering	: Set metering mode (see Notes)
-rot, --rotation	: Set image rotation (0-359)
-hf, --hflip	: Set horizontal flip
-vf, --vflip	: Set vertical flip
-roi, --roi	: Set region of interest (x,y,w,d as normalised coordinates [0.0-1.0])
-ss, --shutter	: Set shutter speed in microseconds
-awbg, --awbgains	: Set AWB gains - AWB mode must be off
-drc, --drc	: Set DRC Level (see Notes)
-st, --stats	: Force recomputation of statistics on stills capture pass
-a, --annotate	: Enable/Set annotate flags or text
-3d, --stereo	: Select stereoscopic mode
-dec, --decimate	: Half width/height of stereo image
-3dswap, --3dswap	: Swap camera order for stereoscopic
-ae, --annotateex	: Set extra annotation parameters (text size, text colour(hex YUV), bg colour(hex YUV))


Notes

Exposure mode options :
off,auto,night,nightpreview,backlight,spotlight,sports,snow,beach,verylong,fixedfps,antishake,fireworks

AWB mode options :
off,auto,sun,cloud,shade,tungsten,fluorescent,incandescent,flash,horizon

Image Effect mode options :
none,negative,solarise,sketch,denoise,emboss,oilpaint,hatch,gpen,pastel,watercolour,film,blur,saturation,colourswap,washedout,posterise,colourpoint,colourbalance,cartoon

Metering Mode options :
average,spot,backlit,matrix

Dynamic Range Compression (DRC) options :
off,low,med,high
Scratch2.0で利用する
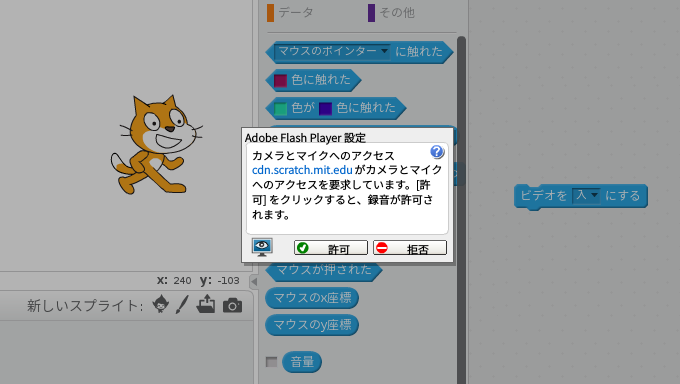
Scratch2.0でもカメラが利用できたんですが、次の日に利用してみたら使えなくなっていました。一度使えたのは何故なのか、それが使えなくなったのは何故なのか・・・謎が深まります
カメラが利用できるときはこのダイアログが出ます
こんな感じで使えたんだけど・・・
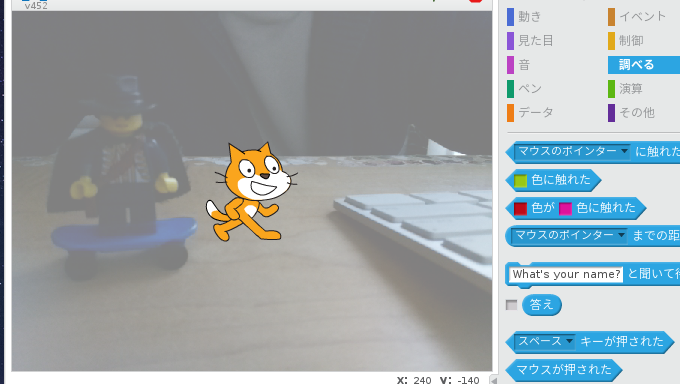
カメラが使えるようにする方法ですが、今の所謎です。なので、Scratch2.0での利用目的でカメラを購入するのはちょっと待ったほうが良いと思います
【追記】カメラを利用する方法がわかりました
Raspberry PiのScratch 2.0でCamera Module V2を使って撮影する方法
阿部先生から情報をいただきました。以下のコマンドをコンソールで実行すれば、Scratch2.0でカメラが利用できるようになります sudo modprobe bcm2835-v4l2 子どもにコマンドを入力させるのは無理・・・という場合は、...
studio.beatnix.co.jp
2017.02.01